


 kim. -


Update on kitchen progress
This blog chronicles my entire kitchen renovation from start to finish. Greentea Design has provided me with their solid wood kitchen cabinets, and I'm taking care of the rest.
If you'd like to be brought up to date, check out the archive in the sidebar for previous posts. I posted recently about more demolition and work begun by my contractor. Now for a bit more demolition (seems to never end) and some of the progress with the walls going back up and plumbing/electrical.
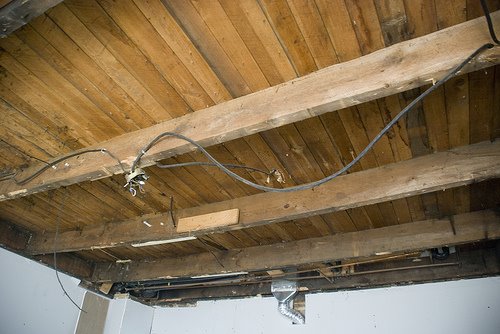
Work continues to progress in my kitchen. I am SO looking forward to finally having a kitchen again and being able to cook. I have never eaten so much pizza in my life and as much as I love pizza, I am tiring of it fast. But things are moving along, and as you would expect in a house of this age, unexpected work kept popping up (along with things I realized at the last minute needed to be fixed - and luckily my contractor is a patient guy). It seems the ceiling needed to be removed to allow the electrician to wire it for my potlights and pendants. The problem was it wasn't just drywall that needed to come down but more wood panelling, which is why it had to come down - he couldn't install the potlights in the panelling. And there was 100 years worth of dust and cobwebs that came down with it. It was TERRIBLE - such a huge mess, and the guys were covered in it when they were done. There was black dust all over the house. (In the left side of the photo below you can see alot of cobwebs - I think I took this after I vacuumed most of the beams).

The contractor discovered what we're thinking is horse hair in the ceiling (just a few chunks), which maybe 100 years ago was used for insulation??

And as a result of taking down the ceiling, the pile of garbage on my driveway grew to new heights.

The electrician was here in the evenings to get all the wiring for the lighting and outlets done, and I can't wait to see how that turns out once all the fixtures are in place. This house severely lacks decent lighting, and now I've got potlights all over, pendants and wall sconces to lighten things up.
This is the wiring done before the ceiling was re-drywalled.

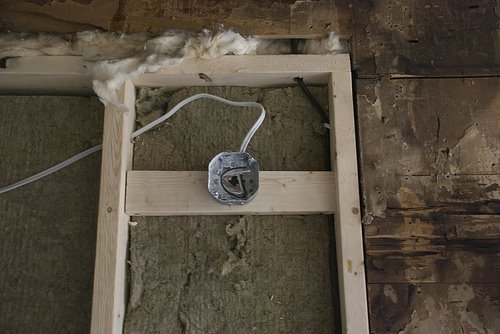
This is the box to house one of my Tolomeo wall lights.
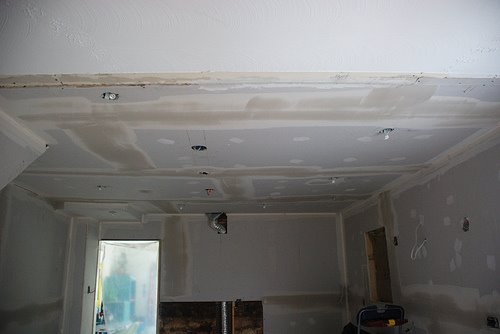
Here is the ceiling completed with the potlights wired up.
The plumber was figuring out where to put the pipes from the bathroom on the other side of the kitchen when we realized that because the corner where the 2 sets of base cabinets meet will be an empty space, he could put the pipes coming up in that space.

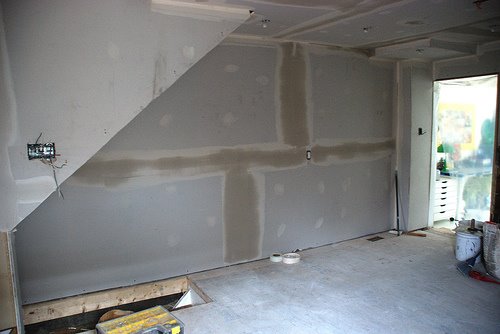
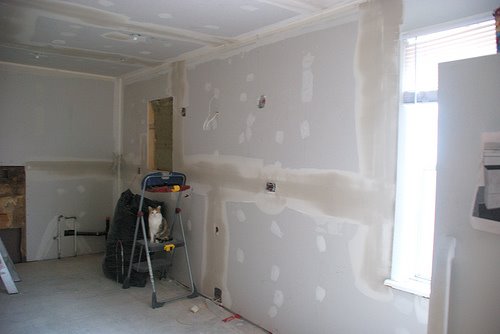
The walls are now all drywalled and need to be finished up.

My window has arrived and will be installed shortly. Today the hardwood is being installed and I've got to rush and paint the floors today/tonight in order for them to be good and dry by Friday when my cabinets arrive (and appliances on Saturday). More on the floors in an upcoming post.
If you'd like to be brought up to date, check out the archive in the sidebar for previous posts. I posted recently about more demolition and work begun by my contractor. Now for a bit more demolition (seems to never end) and some of the progress with the walls going back up and plumbing/electrical.
Work continues to progress in my kitchen. I am SO looking forward to finally having a kitchen again and being able to cook. I have never eaten so much pizza in my life and as much as I love pizza, I am tiring of it fast. But things are moving along, and as you would expect in a house of this age, unexpected work kept popping up (along with things I realized at the last minute needed to be fixed - and luckily my contractor is a patient guy). It seems the ceiling needed to be removed to allow the electrician to wire it for my potlights and pendants. The problem was it wasn't just drywall that needed to come down but more wood panelling, which is why it had to come down - he couldn't install the potlights in the panelling. And there was 100 years worth of dust and cobwebs that came down with it. It was TERRIBLE - such a huge mess, and the guys were covered in it when they were done. There was black dust all over the house. (In the left side of the photo below you can see alot of cobwebs - I think I took this after I vacuumed most of the beams).


The contractor discovered what we're thinking is horse hair in the ceiling (just a few chunks), which maybe 100 years ago was used for insulation??

And as a result of taking down the ceiling, the pile of garbage on my driveway grew to new heights.

The electrician was here in the evenings to get all the wiring for the lighting and outlets done, and I can't wait to see how that turns out once all the fixtures are in place. This house severely lacks decent lighting, and now I've got potlights all over, pendants and wall sconces to lighten things up.
This is the wiring done before the ceiling was re-drywalled.

This is the box to house one of my Tolomeo wall lights.

Here is the ceiling completed with the potlights wired up.

The plumber was figuring out where to put the pipes from the bathroom on the other side of the kitchen when we realized that because the corner where the 2 sets of base cabinets meet will be an empty space, he could put the pipes coming up in that space.

The walls are now all drywalled and need to be finished up.


My window has arrived and will be installed shortly. Today the hardwood is being installed and I've got to rush and paint the floors today/tonight in order for them to be good and dry by Friday when my cabinets arrive (and appliances on Saturday). More on the floors in an upcoming post.
Labels: ceiling, demolition, drywall, lighting
More demolition and preparation for cabinets
This blog chronicles my entire kitchen renovation from start to finish. Greentea Design has provided me with their solid wood kitchen cabinets, and I'm taking care of the rest.
If you'd like to be brought up to date, check out the archive in the sidebar for previous posts. I posted recently about the removal of the old kitchen, and now for more demolition and work begun by my contractor.
Once my boyfriend and I removed the old cabinets and tile floor, the contractor started his work. And of course as it always goes with an old house, there was more work than originally anticipated. And it probably didn't help that I added a little project (ummm, not that little) onto the ever growing list of things that needed to be completed before the cabinets arrive.
I've got to start by talking about the amazing discoveries on the walls behind the drywall and wood panelling. I have never seen so many layers of wallpaper and newspaper in one space. We all got a really good laugh out of that. My boyfriend counted 15 different wallpapers on one chunk he removed.


When we discovered newspaper on the walls behind the wallpaper, I was excited to see how old it was and if there were any dates visible. When I bought this house the age was not disclosed and all I got was the inspector's guess that it was about 90 years old. I did find one date, and although the builders may have used old newspapers they had stashed away, it is amazing to think that this house was built so long ago.

So once the kitchen was stripped bare of all the drywall and the plywood removed from the floor, the contractor got to work on levelling the floor. This was a crucial step as the cabinets would have been on a really obvious slant. The contractor nailed down new thinner plywood over the floorboards (the floorboards were in too much of a rough shape to have skipped this layer), then added strips of wood which he used to level another thin layer of plywood. This will mean that the kitchen floor will be higher than the living room floor but there's nothing I can do about it, and with the floors painted the same colour throughout it won't be that noticeable that there is a little step up into the kitchen.


During the process of removing all the drywall, conversations were had about the wall covering the staircase. I was concerned that it would be a tight fit having a table down the center of the space and trying to get around it with people seated there. Before the demo I took my desk out of my office (which would be a similar width) and we tried it in the kitchen. In the photo below you can see a bit of the wall in question on the left side. On the right there is a little brown rug that shows the depth of the cabinets.

At the last minute I decided to ask for the bottom part of the wall to be removed to allow more room to move around the table. When the wall came down I was SO HAPPY with the decision. It opens up the space so much more and will be a bit of architectural interest to this house (which it is really lacking). I contemplated...ok agonized, over whether I should take out the upper part of the wall as well to expose the staircase going to the second floor, but in the end I decided to leave it in case it's holding up the upper floor. :) I don't really want to mess with anything providing support. Plus, this leaves me with a little bit of a wall to get the electrician to place light switches for the kitchen. The thermostat is already there so it can be my electrical wall.


There's going to be a door in the floor built to cover the opening to the basement stairs that will open upwards. It will be clad in strips of wood to resemble the hardwood that will be the rest of the flooring (but will be lighter). We're trying to find a latch system that allows you to press the door and it pops up to eliminate the need for a handle. My boyfriend went to see our mechanic friend yesterday and got a hinge from the hood of a BMW and that will hopefully allow the door to open and close easily (with some shocks used too). At this moment it's all a theory that has yet to be tested. There will also be a hole cut out in the door to allow the cats to climb in and out of the basement at their leisure to get to the litter boxes.
There are a couple of things the contractor had to frame around, like the plumbing that is located in the corner of the ceiling. There was wood panelling that was bent around the pipes and drywalled over and I'm guessing there was a hump in the ceiling as a result. Also, the heating duct that was located behind the stove that was built on the outside of the wall needed to be recessed into the wall to allow the fridge to be placed as far back as possible. At the top is the vent going into the floor of the bathroom which needed to remain where it was so a frame is going to be built around it to hide it with drywall.


The contractor also removed the window in the kitchen (to be replaced with a smaller one that is 24"x32") and the door leading to the side porch that I had used as my main entrance into the house. When the window was taken out, it was a very VERY odd feeling to see a huge hole in the side of my house.


This is just about where things are at in my kitchen this week. The walls should hopefully be ready for painting by the end of Monday and the floors installed on Tuesday morning. A couple days for painting the walls and floors, and I've asked for the cabinets to be delivered Friday. Fingers crossed once again that all this can happen on schedule.
If you'd like to be brought up to date, check out the archive in the sidebar for previous posts. I posted recently about the removal of the old kitchen, and now for more demolition and work begun by my contractor.
Once my boyfriend and I removed the old cabinets and tile floor, the contractor started his work. And of course as it always goes with an old house, there was more work than originally anticipated. And it probably didn't help that I added a little project (ummm, not that little) onto the ever growing list of things that needed to be completed before the cabinets arrive.
I've got to start by talking about the amazing discoveries on the walls behind the drywall and wood panelling. I have never seen so many layers of wallpaper and newspaper in one space. We all got a really good laugh out of that. My boyfriend counted 15 different wallpapers on one chunk he removed.


When we discovered newspaper on the walls behind the wallpaper, I was excited to see how old it was and if there were any dates visible. When I bought this house the age was not disclosed and all I got was the inspector's guess that it was about 90 years old. I did find one date, and although the builders may have used old newspapers they had stashed away, it is amazing to think that this house was built so long ago.

So once the kitchen was stripped bare of all the drywall and the plywood removed from the floor, the contractor got to work on levelling the floor. This was a crucial step as the cabinets would have been on a really obvious slant. The contractor nailed down new thinner plywood over the floorboards (the floorboards were in too much of a rough shape to have skipped this layer), then added strips of wood which he used to level another thin layer of plywood. This will mean that the kitchen floor will be higher than the living room floor but there's nothing I can do about it, and with the floors painted the same colour throughout it won't be that noticeable that there is a little step up into the kitchen.


During the process of removing all the drywall, conversations were had about the wall covering the staircase. I was concerned that it would be a tight fit having a table down the center of the space and trying to get around it with people seated there. Before the demo I took my desk out of my office (which would be a similar width) and we tried it in the kitchen. In the photo below you can see a bit of the wall in question on the left side. On the right there is a little brown rug that shows the depth of the cabinets.

At the last minute I decided to ask for the bottom part of the wall to be removed to allow more room to move around the table. When the wall came down I was SO HAPPY with the decision. It opens up the space so much more and will be a bit of architectural interest to this house (which it is really lacking). I contemplated...ok agonized, over whether I should take out the upper part of the wall as well to expose the staircase going to the second floor, but in the end I decided to leave it in case it's holding up the upper floor. :) I don't really want to mess with anything providing support. Plus, this leaves me with a little bit of a wall to get the electrician to place light switches for the kitchen. The thermostat is already there so it can be my electrical wall.
The wall before being torn down

The wall after being torn down


View when coming up basement stairs


There's going to be a door in the floor built to cover the opening to the basement stairs that will open upwards. It will be clad in strips of wood to resemble the hardwood that will be the rest of the flooring (but will be lighter). We're trying to find a latch system that allows you to press the door and it pops up to eliminate the need for a handle. My boyfriend went to see our mechanic friend yesterday and got a hinge from the hood of a BMW and that will hopefully allow the door to open and close easily (with some shocks used too). At this moment it's all a theory that has yet to be tested. There will also be a hole cut out in the door to allow the cats to climb in and out of the basement at their leisure to get to the litter boxes.
There are a couple of things the contractor had to frame around, like the plumbing that is located in the corner of the ceiling. There was wood panelling that was bent around the pipes and drywalled over and I'm guessing there was a hump in the ceiling as a result. Also, the heating duct that was located behind the stove that was built on the outside of the wall needed to be recessed into the wall to allow the fridge to be placed as far back as possible. At the top is the vent going into the floor of the bathroom which needed to remain where it was so a frame is going to be built around it to hide it with drywall.


The contractor also removed the window in the kitchen (to be replaced with a smaller one that is 24"x32") and the door leading to the side porch that I had used as my main entrance into the house. When the window was taken out, it was a very VERY odd feeling to see a huge hole in the side of my house.


This is just about where things are at in my kitchen this week. The walls should hopefully be ready for painting by the end of Monday and the floors installed on Tuesday morning. A couple days for painting the walls and floors, and I've asked for the cabinets to be delivered Friday. Fingers crossed once again that all this can happen on schedule.
Labels: construction, demolition, walls
