


 kim. -


Flooring
This blog chronicles my entire kitchen renovation from start to finish. Greentea Design has provided me with their solid wood kitchen cabinets, and I'm taking care of the rest.
If you'd like to be brought up to date, check out the archive in the sidebar for previous posts. I posted recently about some final sketches Greentea created for me and some decisions I've made. Now for the flooring.
One of the steps to this renovation that I was super excited about was getting new flooring. When I first moved into this house I knew I would eventually knock the wall down separating the living room from the kitchen, and continue the same flooring throughout. Since I love the look of painted hardwood, I decided to paint the existing hardwood in the living room (I detested the oak colour) and get hardwood installed in the kitchen and paint it the same colour. I was so excited to see the tiles go that I had lived with since last December (beyond gross). I'll stick a before photo here as a reminder:

As I mentionned in a previous post, the contractor spent alot of time levelling the floor, because it dipped from one end to the other by several inches.

Initially the contractor was going to purchase unfinished hardwood to lay in the kitchen. But when he went to pick it up, he said there were alot of knots showing and was worried it would show through the paint. So he went with finished flooring. And he purchased boxes of various colours that were leftovers from previous customer orders, so it only ended up costing $1.99/sq.ft. When they started laying it, we all got a kick out of the different colours and thought it looked pretty cool.


As you can see in the last photo, because the floor involved some layers to get it level, the kitchen is now a little step up from the living room. The contractor put a nice curved finishing piece on the edge.


I had a dilemma for a while about what colour to paint the floor. It was between white and gray. I ended up choosing gray because I just can't imagine dealing with the fur of 6 cats and the dirt I create on white floors. I would lose my marbles. I went with Pigeon Gray by Benjamin Moore.


I didn't want to use floor paint from Benjamin Moore because each coat needs 24 hours to dry and I had to live in the house with the 6 cats during the painting. Also, I had asked for the cabinets to be delivered on the 14th, and the floors and ceiling weren't ready until late afternoon on the 12th. I asked at the store what I could do that was faster than floor paint. I was told I could just use regular paint and varathane over it. I figured I'd give it a try. And now that it's done I'm regretting my decision for a quick way out. I started with a primer, which doesn't seem to have stuck very well to the hardwood. At Home Depot I asked what I should use as a primer and obviously I should have either sanded first, which I had no time for, or bought a better primer.


After 1 coat of primer I put on 2 coats of the gray, then 2 coats of varathane. Here are the floors after the first coat of gray (in an eggshell finish).


Here are the floors with all 5 coats applied.


They do not seem to be as durable as the floors in my office where I used Benjamin Moore's floor paint. There are also streaks from the special brush used to apply the varathane (but I didn't sand so this is my fault - although I didn't sand my office and there are no brush marks). I think next time I will find a temporary home for the cats and myself and use durable floor paint. For now, I am too tired of painting to deal with it. I'll see how it goes, and eventually I'll probably slap a coat of floor paint over the floors if they get scratched up. In the meantime, I'm going to sit back and enjoy them, because the gray turned out fantastic and exactly what I had in mind.
Next time, a post about the arrival of the cabinets. One word - INCREDIBLE!
Awaiting the cabinets
This blog chronicles my entire kitchen renovation from start to finish. Greentea Design has provided me with their solid wood kitchen cabinets, and I'm taking care of the rest.
If you'd like to be brought up to date, check out the archive in the sidebar for previous posts. I posted recently about more demolition and some of the progress with the walls going back up and plumbing/electrical. Now for some final sketches Greentea created for me and some decisions I've made.
I am anxiously awaiting the arrival of my cabinets - and today is the big day! This is about 2 weeks later than initially scheduled, but when you they are coming from the other side of the world, you need to factor in the possibility of issues arising on their way over. The delay in my cabinets was due to the Olympics, as they were held up at a port due to extra security. Totally understandable. Then Greentea contacted me to let me know that my cabinets were arriving a bit earlier than anticipated and if they could be delivered on the 6th of this month. I panicked initially. I knew the construction in my kitchen would not be completed by the 6th and because my house is so small, I would have nowhere to store the cabinets in the meantime. I asked them if it were possible for them to be delivered on the 14th instead, which would give my contractor and myself enough time to complete the space enough to be able to put the cabinets in place. (Turns out I am barely able to make this happen). The guys at Greentea were more than happy to hang on to the cabinets until I was ready to receive them. Unexpected things can happen but they are able to work with their customers to solve issues like the timing of shipments and such. I am so grateful they were accomodating because my house would be in complete chaos otherwise. This has been such an awesome experience dealing with Greentea and I've got to give them props for this. They couldn't be nicer and I'm going to be very proud to have what I know will be a stunning kitchen.
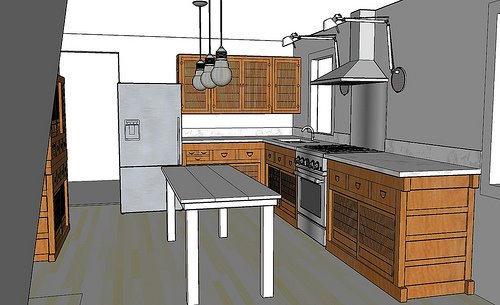
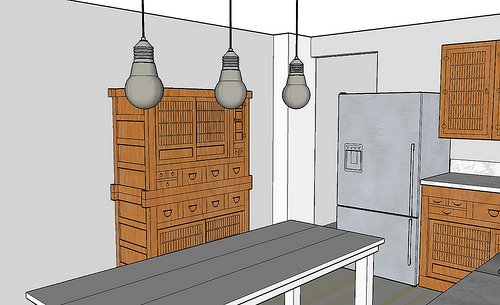
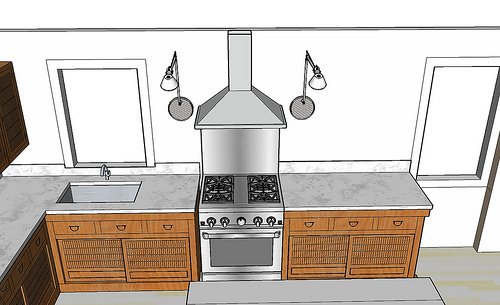
Ok, enough of the warm and fuzzies. Mike, who's a whiz at sketching up kitchens, sent me some final sketches of my kitchen and I was SO excited to see what the finished product will look like. It's one thing to have an idea in your head but to see it with all the finishing touches is amazing. I love technology! Greentea's ability to do sketches is a fabulous feature that is incredibly helpful for their clients, especially those who are new to renovations and designing a kitchen (like me). So without further ado, I'd like to introduce you to what will be my new kitchen!


There are a couple items in the sketches that show some of my final choices to things I was unsure about. One being the dining table. Greentea had initially suggested their narrow Maru dining table:

It's gorgeous wood (reclaimed woods from century-old Korean farmhouses), narrow (which I am having a hard time finding ANY narrow dining tables) and wood match the cabinets beautifully, but because I like to mix up styles, I decided to go with something a little different. But I can't find anything. So my boyfriend did some googling and he thinks we can build a pretty decent table. My contractor is getting a friend of his to cut and plane some planks of wood for us to use. It'll be about 7 feet long and 2.5 feet wide. I'm not sure what to do about the legs but maybe just some simple straight posts would do the trick. Then I want to paint it either white or grey. Things have been so crazy that we haven't started this project yet. Unfortunately I only have 2 hands. Here is an idea of what it will look like:
I have also decided on a backsplash. Several people suggested using the same material as the countertop and I've decided that I really like the simplicity of this and will keep me from losing my mind trying to chose tiles or something else. It will be about 3 or 4 inches high and run the full length of the base cabinets. When I went to the shop where I got my quartz to ask about this, I was told it wouldn't be a problem, and it would cost about $250 installed. YAY! Sounds good to me! Here are some examples:
Lastly, I posted the other day about some purchases I made at the Third World Bazaar here in Ottawa. I think these will be a great start to accessorize the space (my living room as well).

If you'd like to be brought up to date, check out the archive in the sidebar for previous posts. I posted recently about more demolition and some of the progress with the walls going back up and plumbing/electrical. Now for some final sketches Greentea created for me and some decisions I've made.
I am anxiously awaiting the arrival of my cabinets - and today is the big day! This is about 2 weeks later than initially scheduled, but when you they are coming from the other side of the world, you need to factor in the possibility of issues arising on their way over. The delay in my cabinets was due to the Olympics, as they were held up at a port due to extra security. Totally understandable. Then Greentea contacted me to let me know that my cabinets were arriving a bit earlier than anticipated and if they could be delivered on the 6th of this month. I panicked initially. I knew the construction in my kitchen would not be completed by the 6th and because my house is so small, I would have nowhere to store the cabinets in the meantime. I asked them if it were possible for them to be delivered on the 14th instead, which would give my contractor and myself enough time to complete the space enough to be able to put the cabinets in place. (Turns out I am barely able to make this happen). The guys at Greentea were more than happy to hang on to the cabinets until I was ready to receive them. Unexpected things can happen but they are able to work with their customers to solve issues like the timing of shipments and such. I am so grateful they were accomodating because my house would be in complete chaos otherwise. This has been such an awesome experience dealing with Greentea and I've got to give them props for this. They couldn't be nicer and I'm going to be very proud to have what I know will be a stunning kitchen.
Ok, enough of the warm and fuzzies. Mike, who's a whiz at sketching up kitchens, sent me some final sketches of my kitchen and I was SO excited to see what the finished product will look like. It's one thing to have an idea in your head but to see it with all the finishing touches is amazing. I love technology! Greentea's ability to do sketches is a fabulous feature that is incredibly helpful for their clients, especially those who are new to renovations and designing a kitchen (like me). So without further ado, I'd like to introduce you to what will be my new kitchen!


There are a couple items in the sketches that show some of my final choices to things I was unsure about. One being the dining table. Greentea had initially suggested their narrow Maru dining table:

It's gorgeous wood (reclaimed woods from century-old Korean farmhouses), narrow (which I am having a hard time finding ANY narrow dining tables) and wood match the cabinets beautifully, but because I like to mix up styles, I decided to go with something a little different. But I can't find anything. So my boyfriend did some googling and he thinks we can build a pretty decent table. My contractor is getting a friend of his to cut and plane some planks of wood for us to use. It'll be about 7 feet long and 2.5 feet wide. I'm not sure what to do about the legs but maybe just some simple straight posts would do the trick. Then I want to paint it either white or grey. Things have been so crazy that we haven't started this project yet. Unfortunately I only have 2 hands. Here is an idea of what it will look like:
 |  |
| Nate Berkus | Zege |
I have also decided on a backsplash. Several people suggested using the same material as the countertop and I've decided that I really like the simplicity of this and will keep me from losing my mind trying to chose tiles or something else. It will be about 3 or 4 inches high and run the full length of the base cabinets. When I went to the shop where I got my quartz to ask about this, I was told it wouldn't be a problem, and it would cost about $250 installed. YAY! Sounds good to me! Here are some examples:
 |  |
| Domino | DFAO |


Labels: accessories, backsplash, dining table, sketches
Update on kitchen progress
This blog chronicles my entire kitchen renovation from start to finish. Greentea Design has provided me with their solid wood kitchen cabinets, and I'm taking care of the rest.
If you'd like to be brought up to date, check out the archive in the sidebar for previous posts. I posted recently about more demolition and work begun by my contractor. Now for a bit more demolition (seems to never end) and some of the progress with the walls going back up and plumbing/electrical.
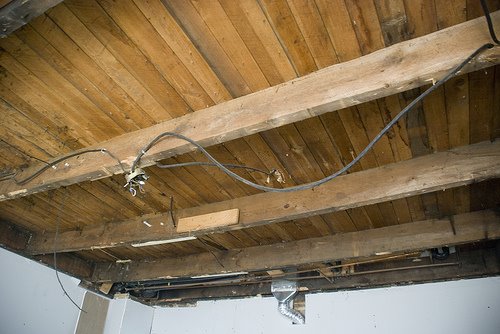
Work continues to progress in my kitchen. I am SO looking forward to finally having a kitchen again and being able to cook. I have never eaten so much pizza in my life and as much as I love pizza, I am tiring of it fast. But things are moving along, and as you would expect in a house of this age, unexpected work kept popping up (along with things I realized at the last minute needed to be fixed - and luckily my contractor is a patient guy). It seems the ceiling needed to be removed to allow the electrician to wire it for my potlights and pendants. The problem was it wasn't just drywall that needed to come down but more wood panelling, which is why it had to come down - he couldn't install the potlights in the panelling. And there was 100 years worth of dust and cobwebs that came down with it. It was TERRIBLE - such a huge mess, and the guys were covered in it when they were done. There was black dust all over the house. (In the left side of the photo below you can see alot of cobwebs - I think I took this after I vacuumed most of the beams).

The contractor discovered what we're thinking is horse hair in the ceiling (just a few chunks), which maybe 100 years ago was used for insulation??

And as a result of taking down the ceiling, the pile of garbage on my driveway grew to new heights.

The electrician was here in the evenings to get all the wiring for the lighting and outlets done, and I can't wait to see how that turns out once all the fixtures are in place. This house severely lacks decent lighting, and now I've got potlights all over, pendants and wall sconces to lighten things up.
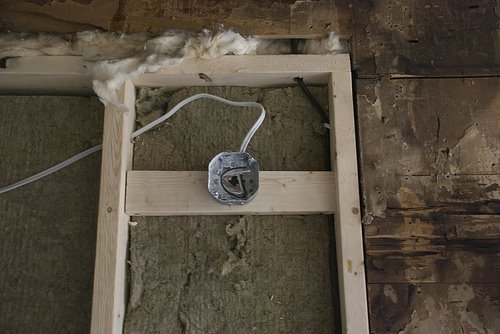
This is the wiring done before the ceiling was re-drywalled.

This is the box to house one of my Tolomeo wall lights.
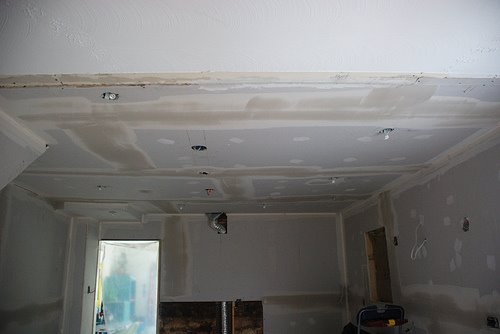
Here is the ceiling completed with the potlights wired up.
The plumber was figuring out where to put the pipes from the bathroom on the other side of the kitchen when we realized that because the corner where the 2 sets of base cabinets meet will be an empty space, he could put the pipes coming up in that space.

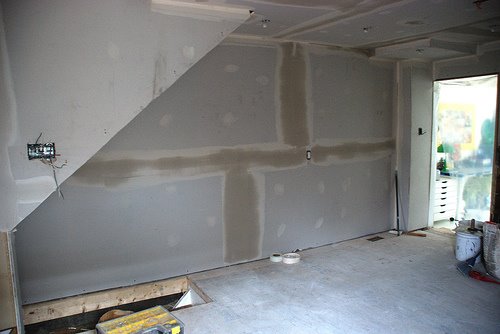
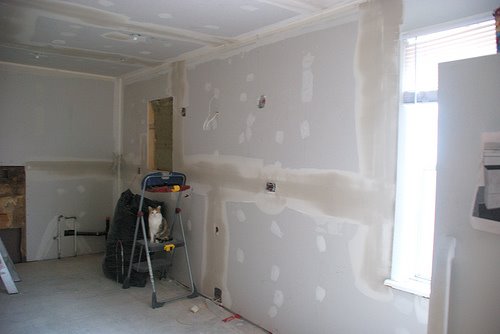
The walls are now all drywalled and need to be finished up.

My window has arrived and will be installed shortly. Today the hardwood is being installed and I've got to rush and paint the floors today/tonight in order for them to be good and dry by Friday when my cabinets arrive (and appliances on Saturday). More on the floors in an upcoming post.
If you'd like to be brought up to date, check out the archive in the sidebar for previous posts. I posted recently about more demolition and work begun by my contractor. Now for a bit more demolition (seems to never end) and some of the progress with the walls going back up and plumbing/electrical.
Work continues to progress in my kitchen. I am SO looking forward to finally having a kitchen again and being able to cook. I have never eaten so much pizza in my life and as much as I love pizza, I am tiring of it fast. But things are moving along, and as you would expect in a house of this age, unexpected work kept popping up (along with things I realized at the last minute needed to be fixed - and luckily my contractor is a patient guy). It seems the ceiling needed to be removed to allow the electrician to wire it for my potlights and pendants. The problem was it wasn't just drywall that needed to come down but more wood panelling, which is why it had to come down - he couldn't install the potlights in the panelling. And there was 100 years worth of dust and cobwebs that came down with it. It was TERRIBLE - such a huge mess, and the guys were covered in it when they were done. There was black dust all over the house. (In the left side of the photo below you can see alot of cobwebs - I think I took this after I vacuumed most of the beams).


The contractor discovered what we're thinking is horse hair in the ceiling (just a few chunks), which maybe 100 years ago was used for insulation??

And as a result of taking down the ceiling, the pile of garbage on my driveway grew to new heights.

The electrician was here in the evenings to get all the wiring for the lighting and outlets done, and I can't wait to see how that turns out once all the fixtures are in place. This house severely lacks decent lighting, and now I've got potlights all over, pendants and wall sconces to lighten things up.
This is the wiring done before the ceiling was re-drywalled.

This is the box to house one of my Tolomeo wall lights.

Here is the ceiling completed with the potlights wired up.

The plumber was figuring out where to put the pipes from the bathroom on the other side of the kitchen when we realized that because the corner where the 2 sets of base cabinets meet will be an empty space, he could put the pipes coming up in that space.

The walls are now all drywalled and need to be finished up.


My window has arrived and will be installed shortly. Today the hardwood is being installed and I've got to rush and paint the floors today/tonight in order for them to be good and dry by Friday when my cabinets arrive (and appliances on Saturday). More on the floors in an upcoming post.
Labels: ceiling, demolition, drywall, lighting
